Key Moments
00:00:00Welcome to my two-car garage transformation into a dream home golf simulator using SkyRack's new 8ft studio, where I'll show you the unboxing, setup, and first use.
00:00:30The garage is a standard two-car space measuring 20 by 24 feet with a 10-foot ceiling, accommodating golf club swings despite fixed obstacles like a staircase and storage rack.
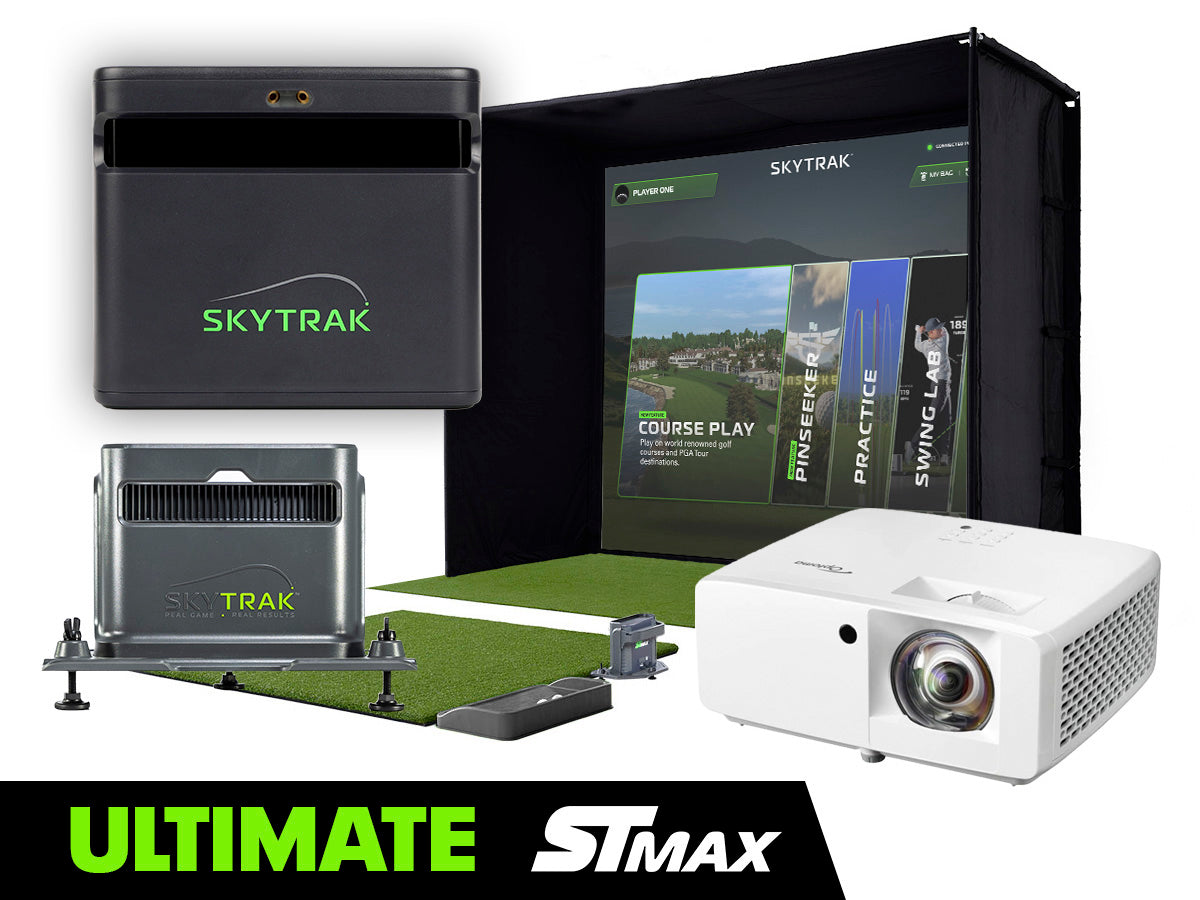
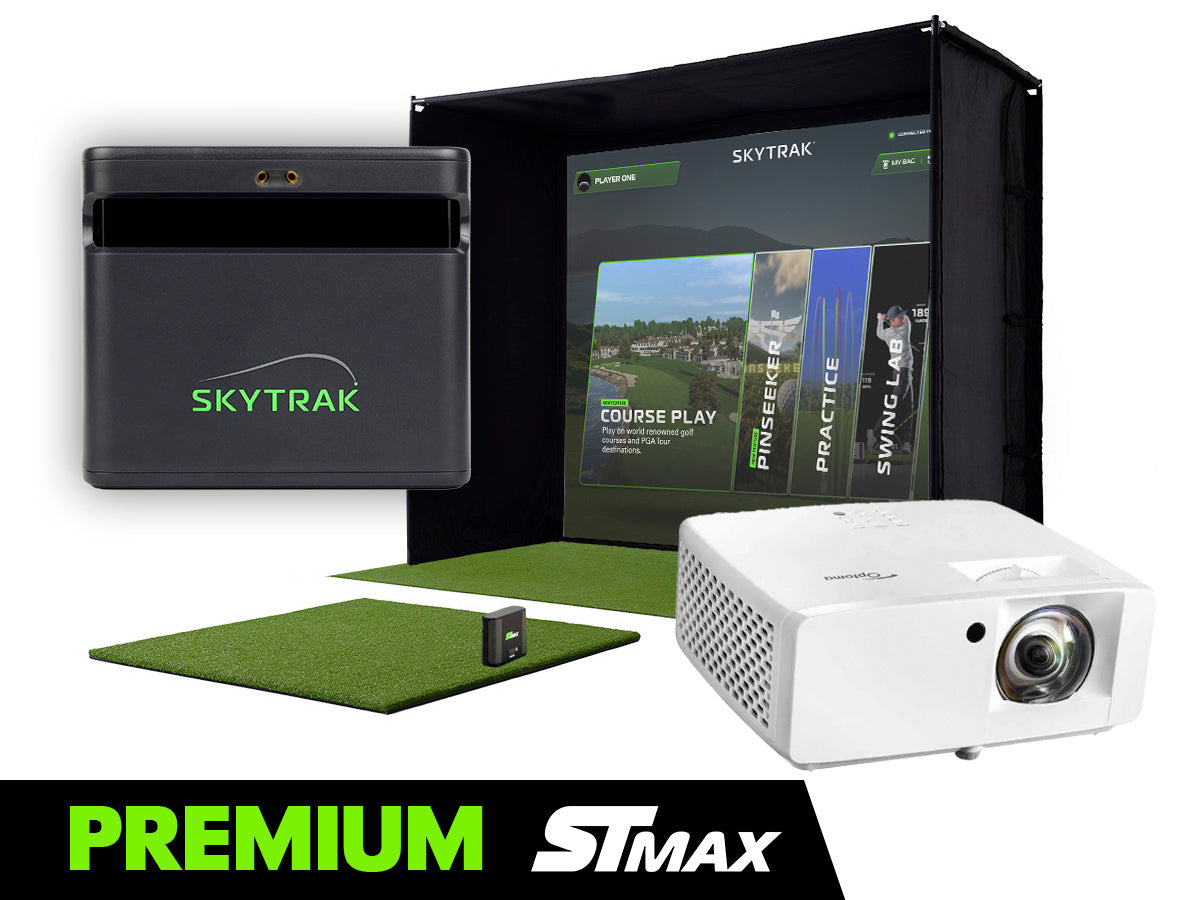
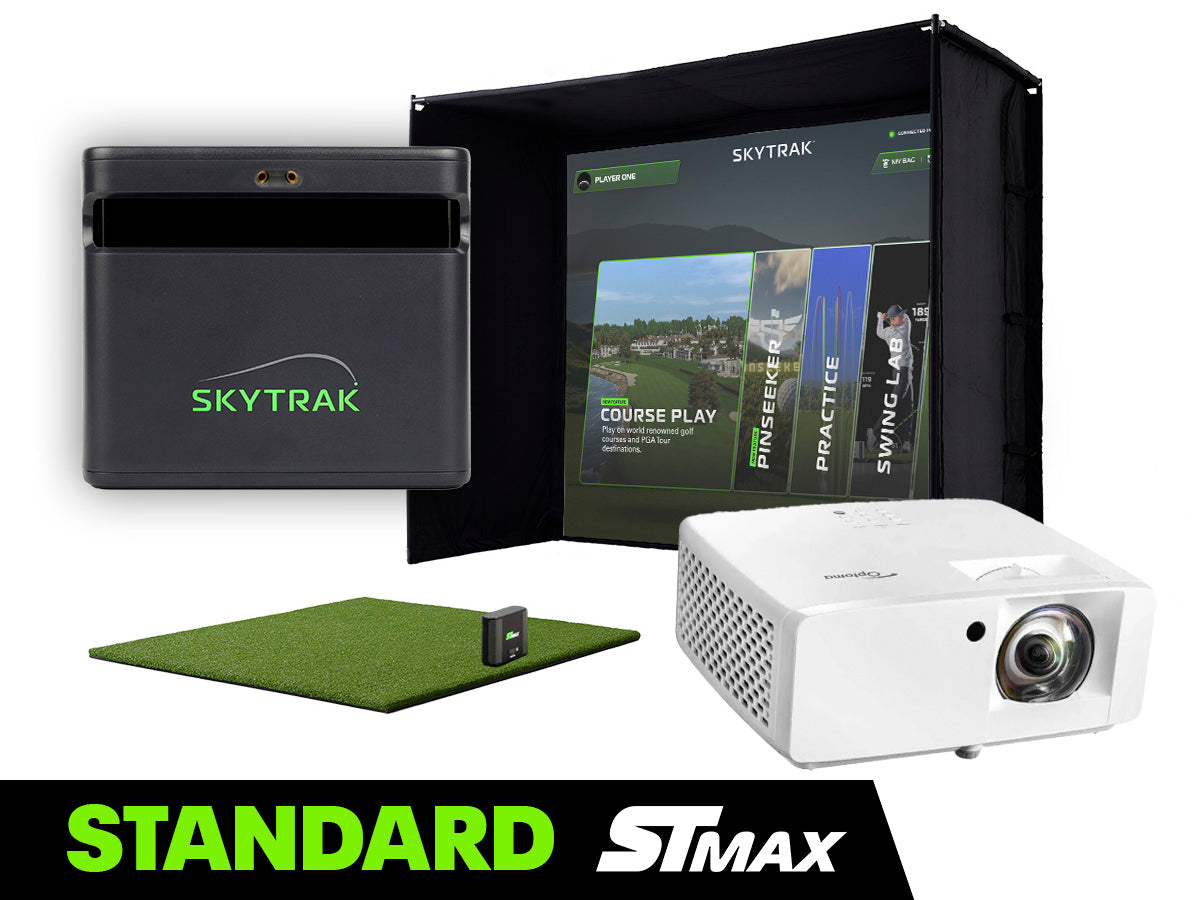
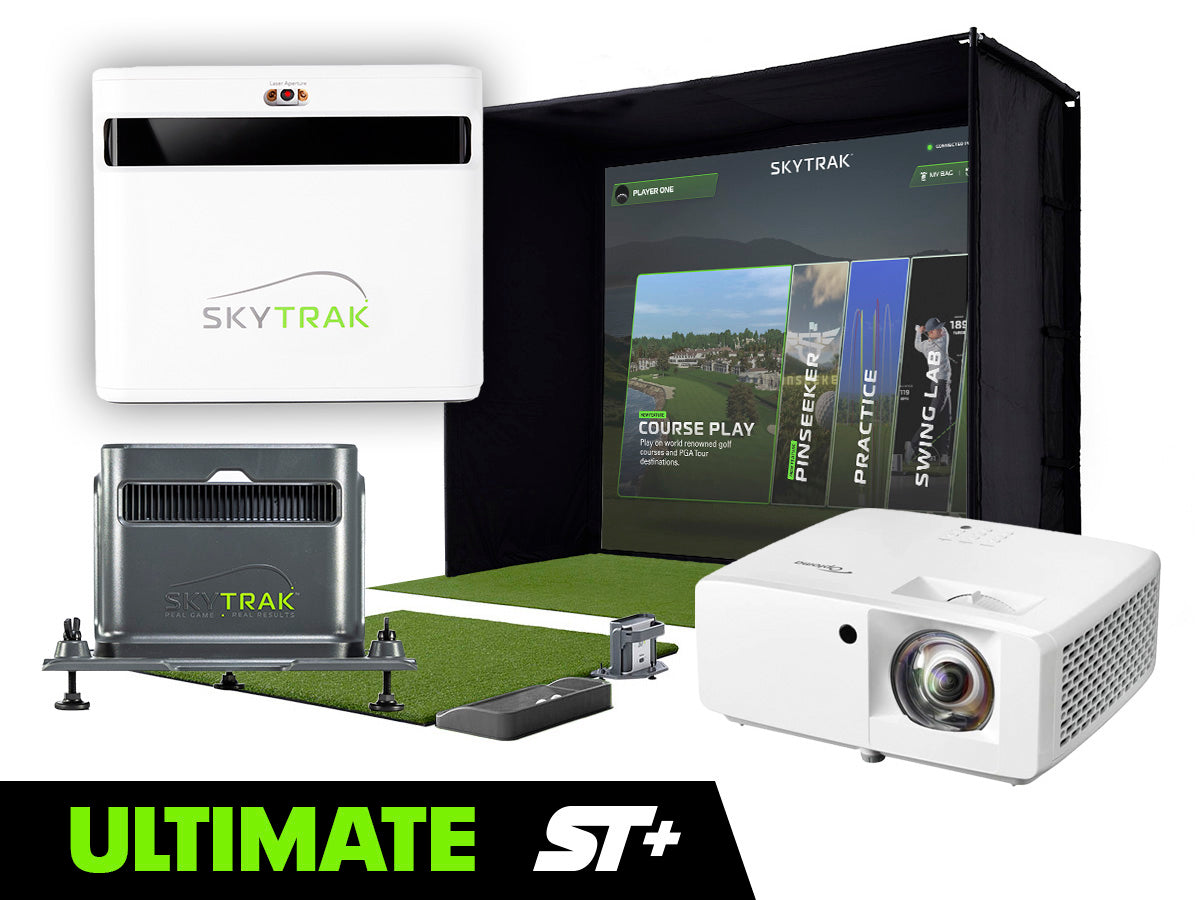
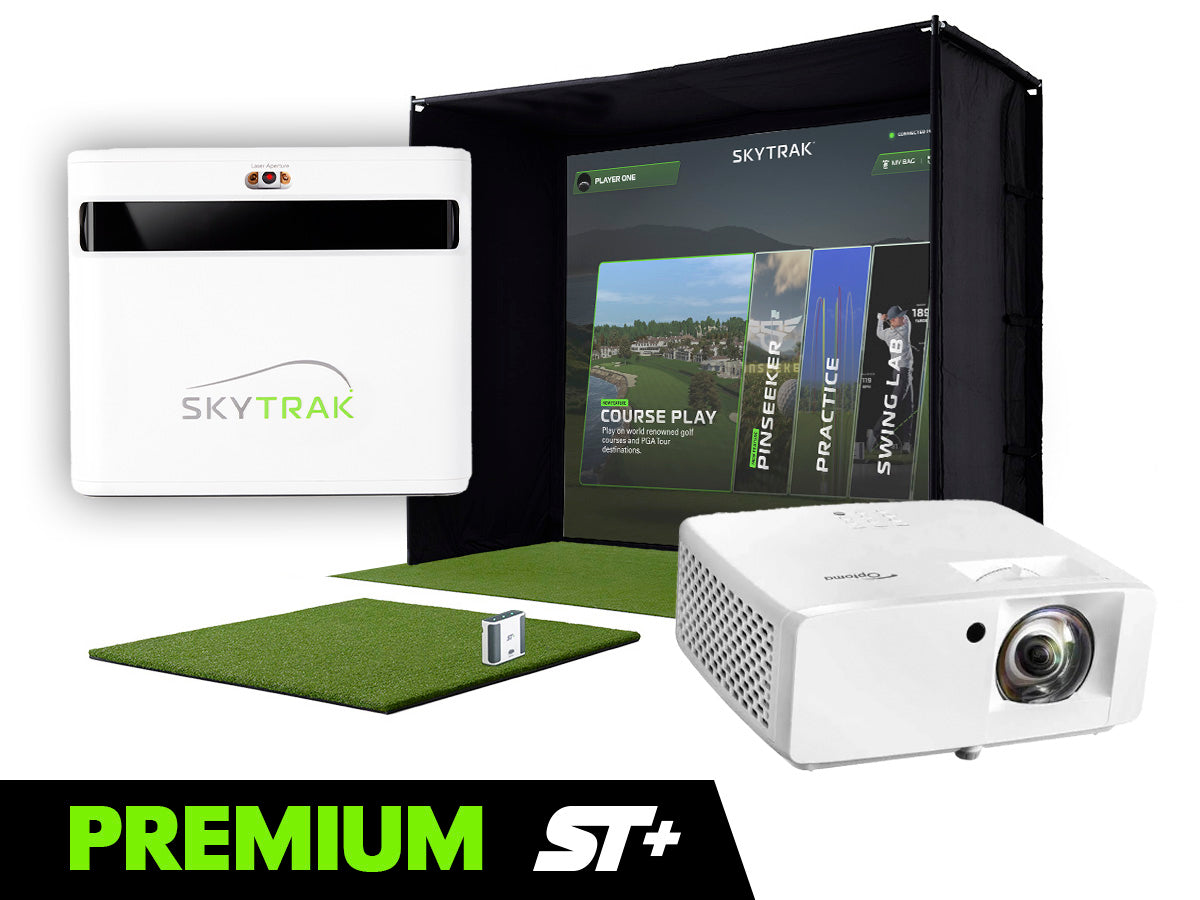
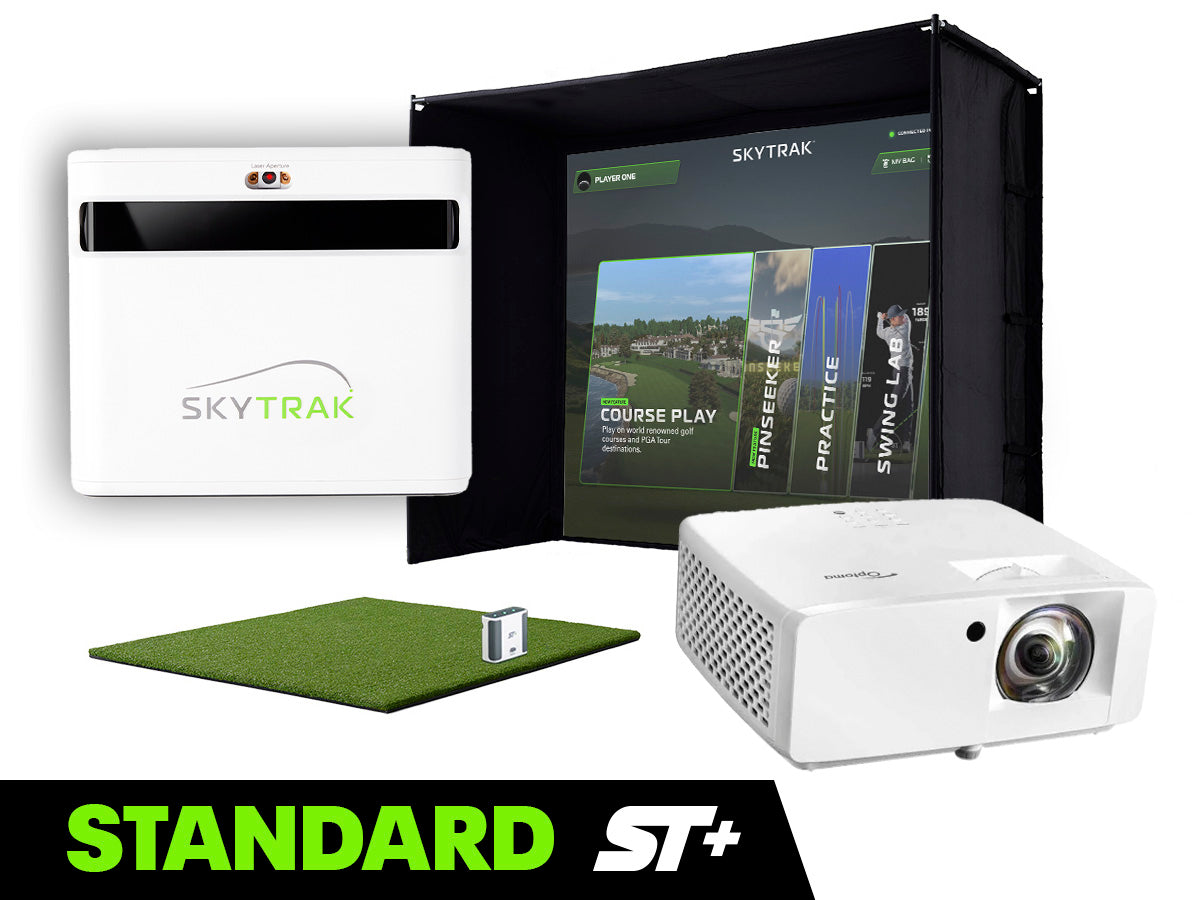
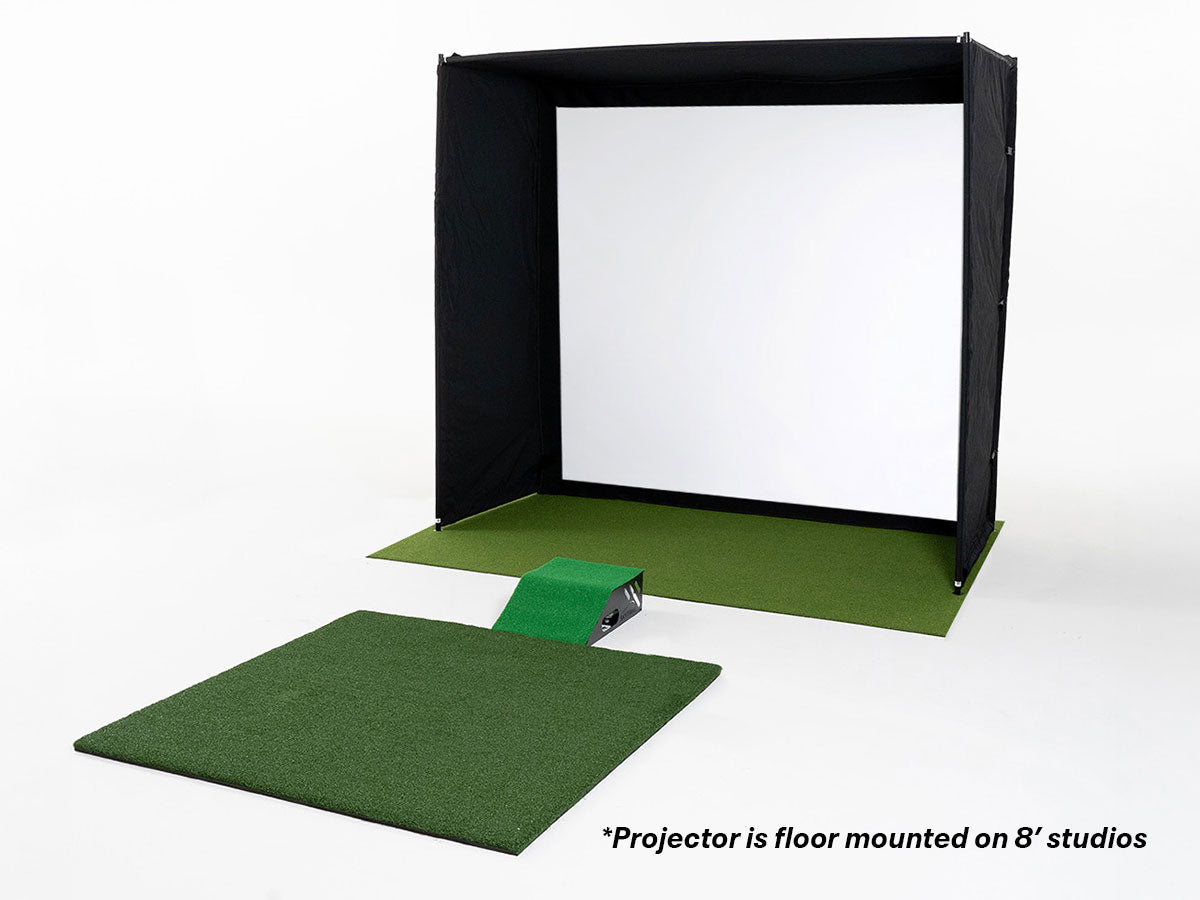
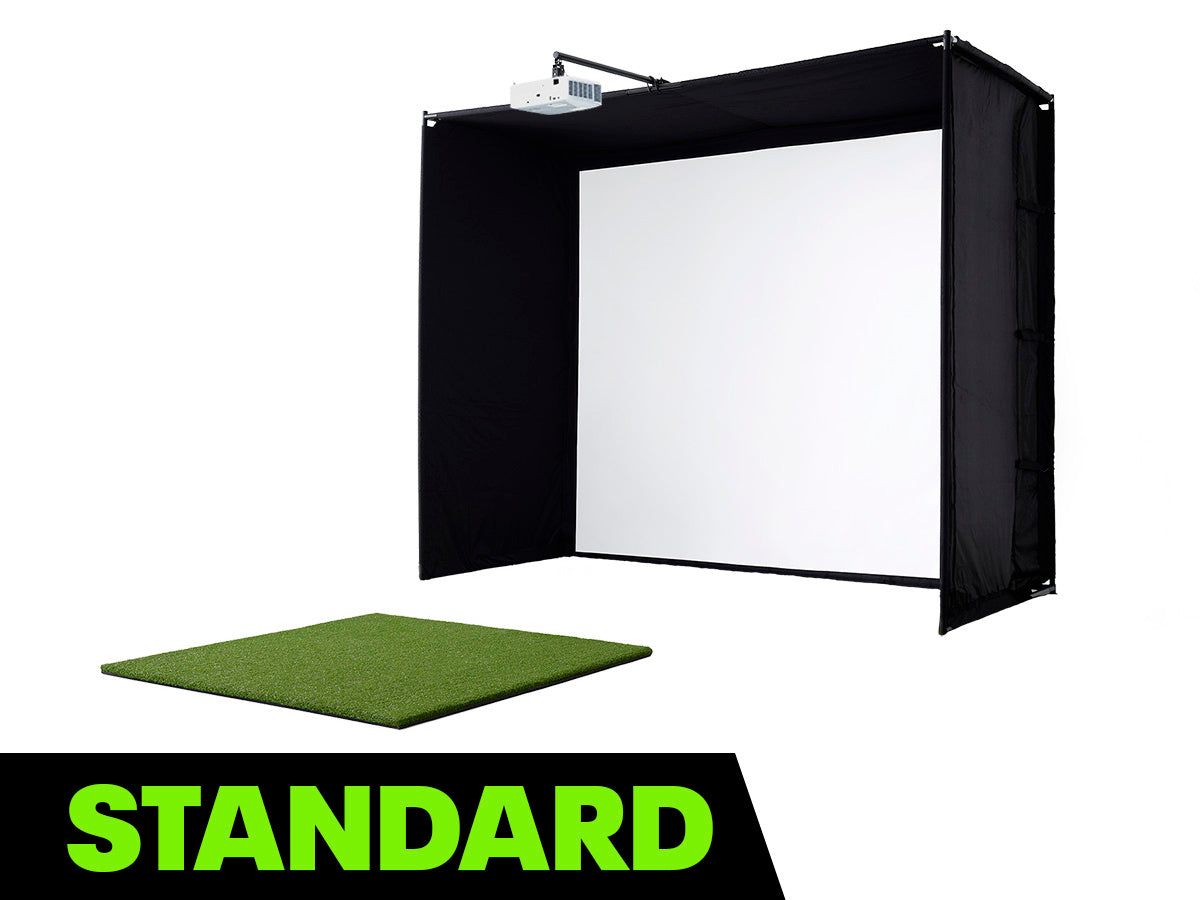
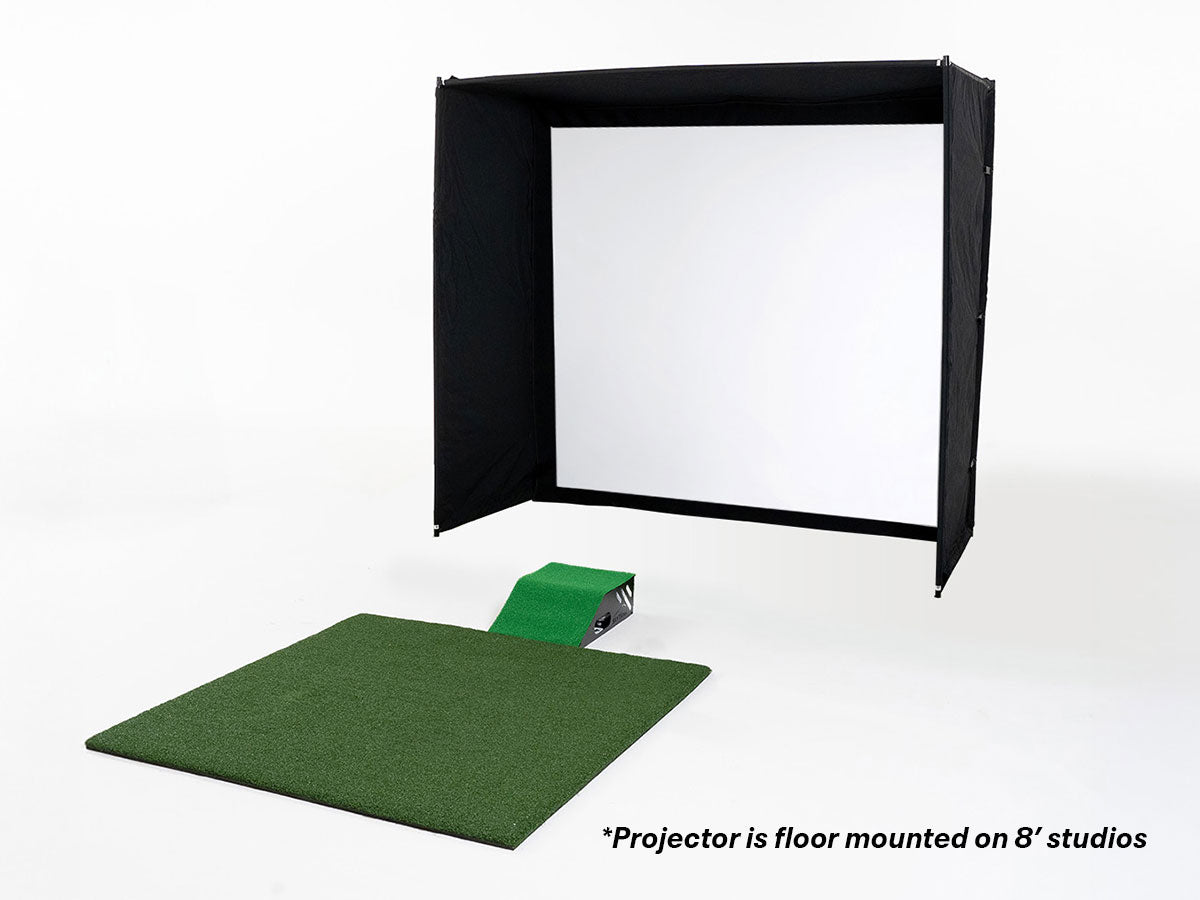
00:01:36The ultimate SkyRack studio package includes everything needed for a complete home golf simulator setup, featuring an 8ft studio, ball tray, enclosure, turf, hitting mat, ST Plus launch monitor, GT200 HDR Optima projector, and an optional projector floor mount for protection.
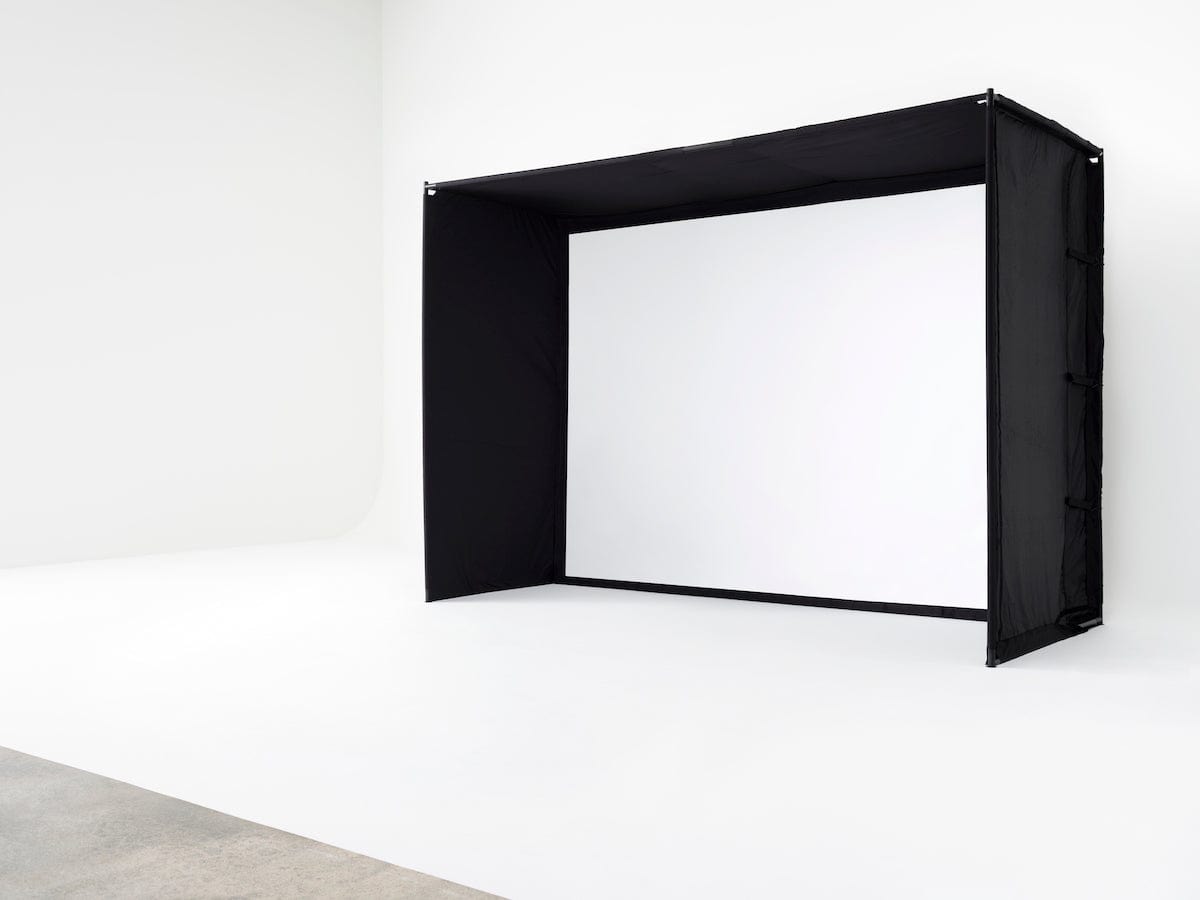
00:02:45The unboxing includes an 8-ft enclosure with frame poles, corner brackets, straps, the enclosure and screen, plus an instruction manual recommending starting assembly from the top down.
00:04:01Place the enclosure on the frame before finishing the next layer, remove the screen inside the enclosure for 8-foot models, and identify the top by locating the three Velcro tie downs to ease assembly.
00:05:14The enclosure is being assembled from the top down with Velcro adjustments and tie downs, and the final steps include attaching the legs and base to make the process easier for one person.
00:06:25The enclosure and frame are built, and the next step is to loosely attach the Velcro on the sides before putting on the screen, remembering to use the three Velcro tie downs on each side.
00:07:18The final step with the enclosure is installing the impact screen using Velcro tabs that indicate the top, starting from the upper right corner.
00:07:47The video demonstrates how to build an 8ft studio enclosure solo, emphasizing starting the frame from the top down, securing it with Velcro straps, installing the impact screen, and then setting up the hitting mat, ball tray, projector, and floor mount case.
00:09:06We are nearly done with the full simulator setup and will provide a separate video for projector setup, while also guiding ST+ unit users to skyrackgolf.com for step-by-step instructions before unboxing and setting up the ST+ launch monitor.
00:09:56I just built an 8ft SkyRack golf simulator studio in my garage and encourage you to visit skitrackgolf.com to explore packages and book a free consultation.
Insights
🏠 Transforming a standard two-car garage into a dream home golf simulator is possible with SkyRack's new 8ft studio.
📏 Ceiling height is crucial for a golf simulator setup, with a minimum of 9ft recommended to swing every club comfortably.
🛠 Building the enclosure from the top down and installing the enclosure halfway through assembly makes solo setup much easier.
🔗 Velcro tie downs on the enclosure and impact screen simplify installation and adjustment for a snug fit.
🎥 The ultimate studio package includes everything needed for a complete simulator, including a launch monitor and projector.
💡 Free consultations are available to help customize your golf simulator to fit your space and budget.
Transcript
00:00What's up, Skyrack? Welcome to my twocar garage that I'm about to turn into a dream home golf simulator. We're going to be using SkyRack's newest 8ft studio available now. I'm going to show you everything from unboxing to setup to me finally hitting on it. Let's get into it.
00:30First, let's talk about my overall garage setup. It is a very standard twocar garage. I'm going to go through the measurements that way you have a frame of reference for yours. I've already measured this, so I do know it's 20 ft in width, but I'll just show you here. So, I've got 20 feet width. And then here, this is going to be 24 feet of depth. Ceiling height is a question that we get all the time. We advise that depending on your height, you're going to want 9 ft minimum. So,
01:07you can be able to swing every club in your bag. Luckily for me, my ceiling height with the garage door down is 10 ft. So, I've got plenty of room for every club in my bag. A couple of the things that I've had to take into consideration with my garage setup. Number one, I've got this staircase right here. So, I'm not going to move that at all. And then two, I've got a big storage rack here that I'm also not going to move. So, that just goes to show that whatever your space is,
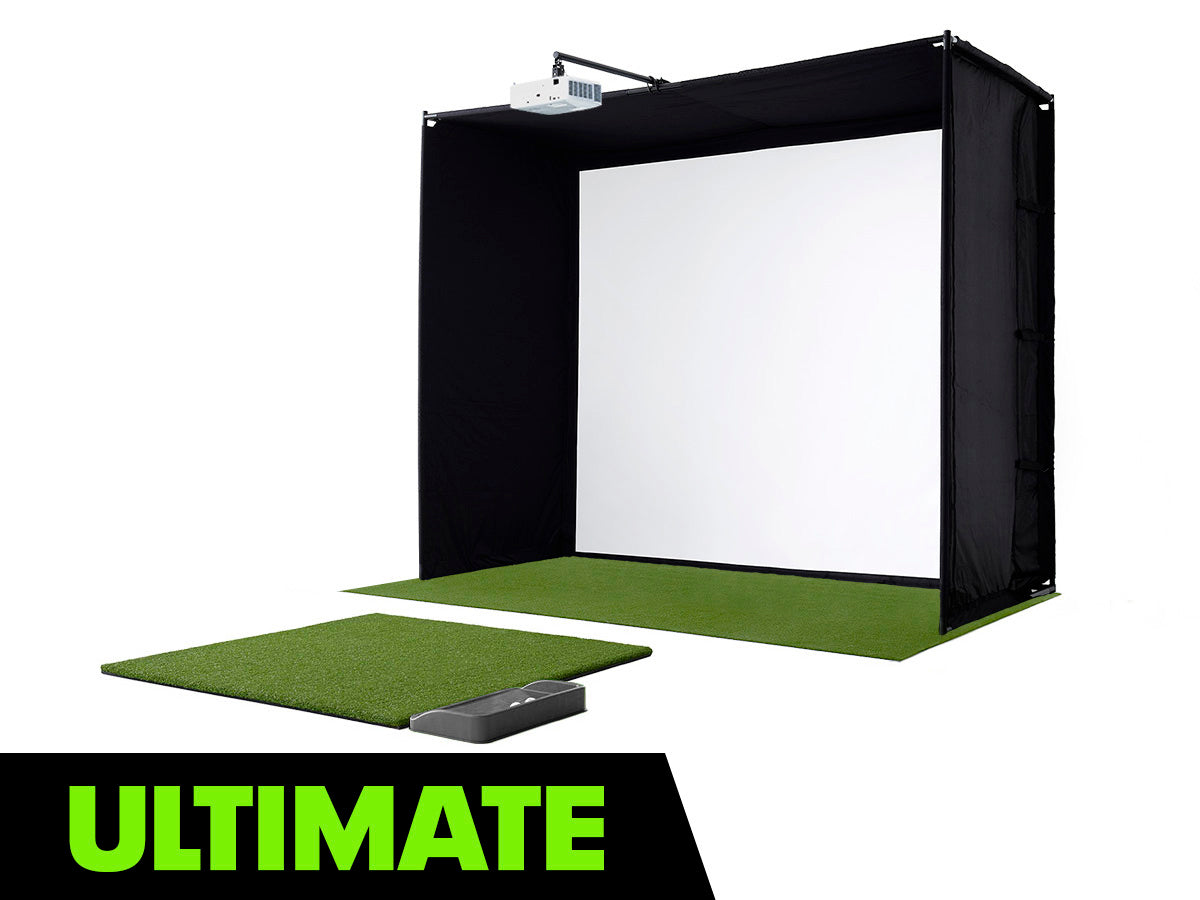
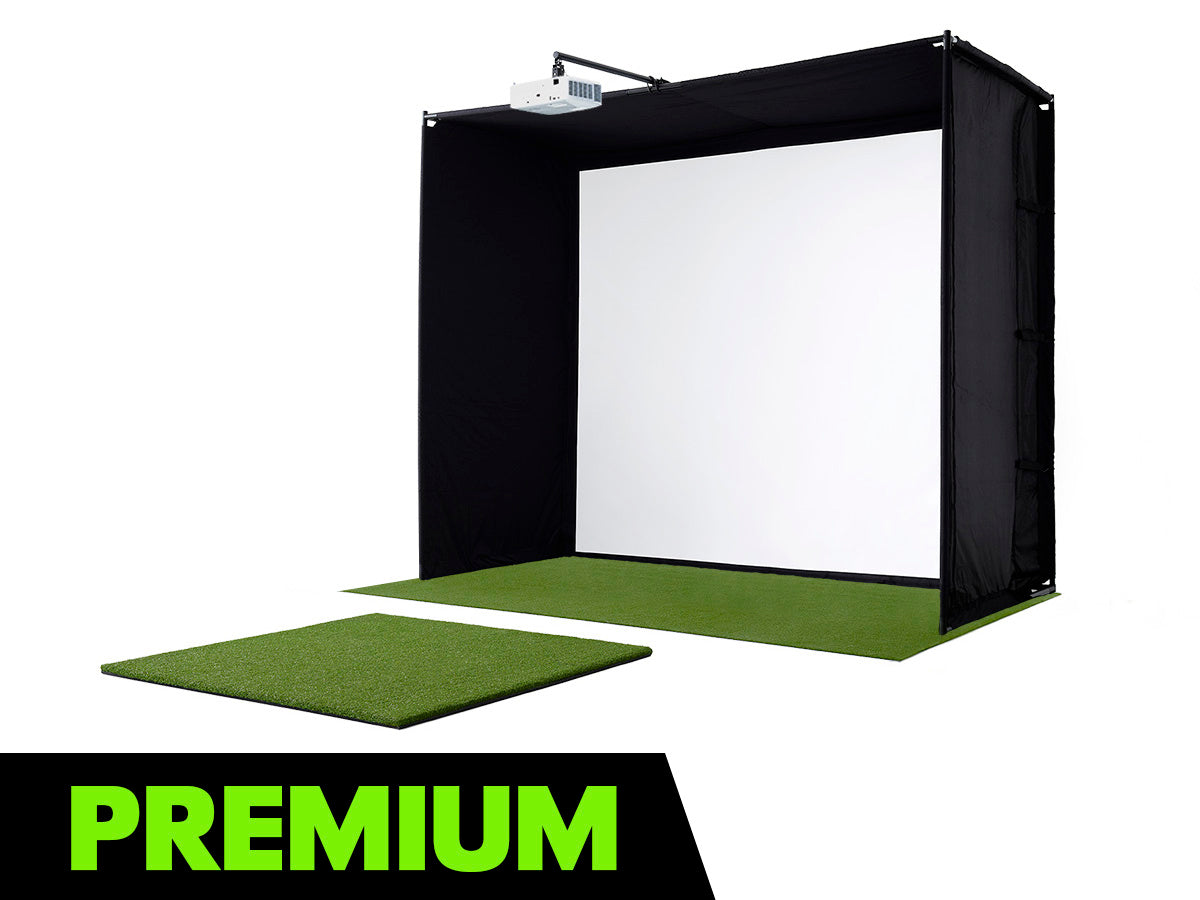
01:36especially with this new 8ft studio, we'll be able to make it work in even the smallest of spaces. We've walked through the garage setup. We've walked through some of the challenges that I have. Now all I need is the SkyRack studio. For this package that I got, I went with the ultimate studio package. So with that, you get the ball tray, you get your enclosure, which is your frame, your screen, and your enclosure. You get your 8ft or whatever size that you're
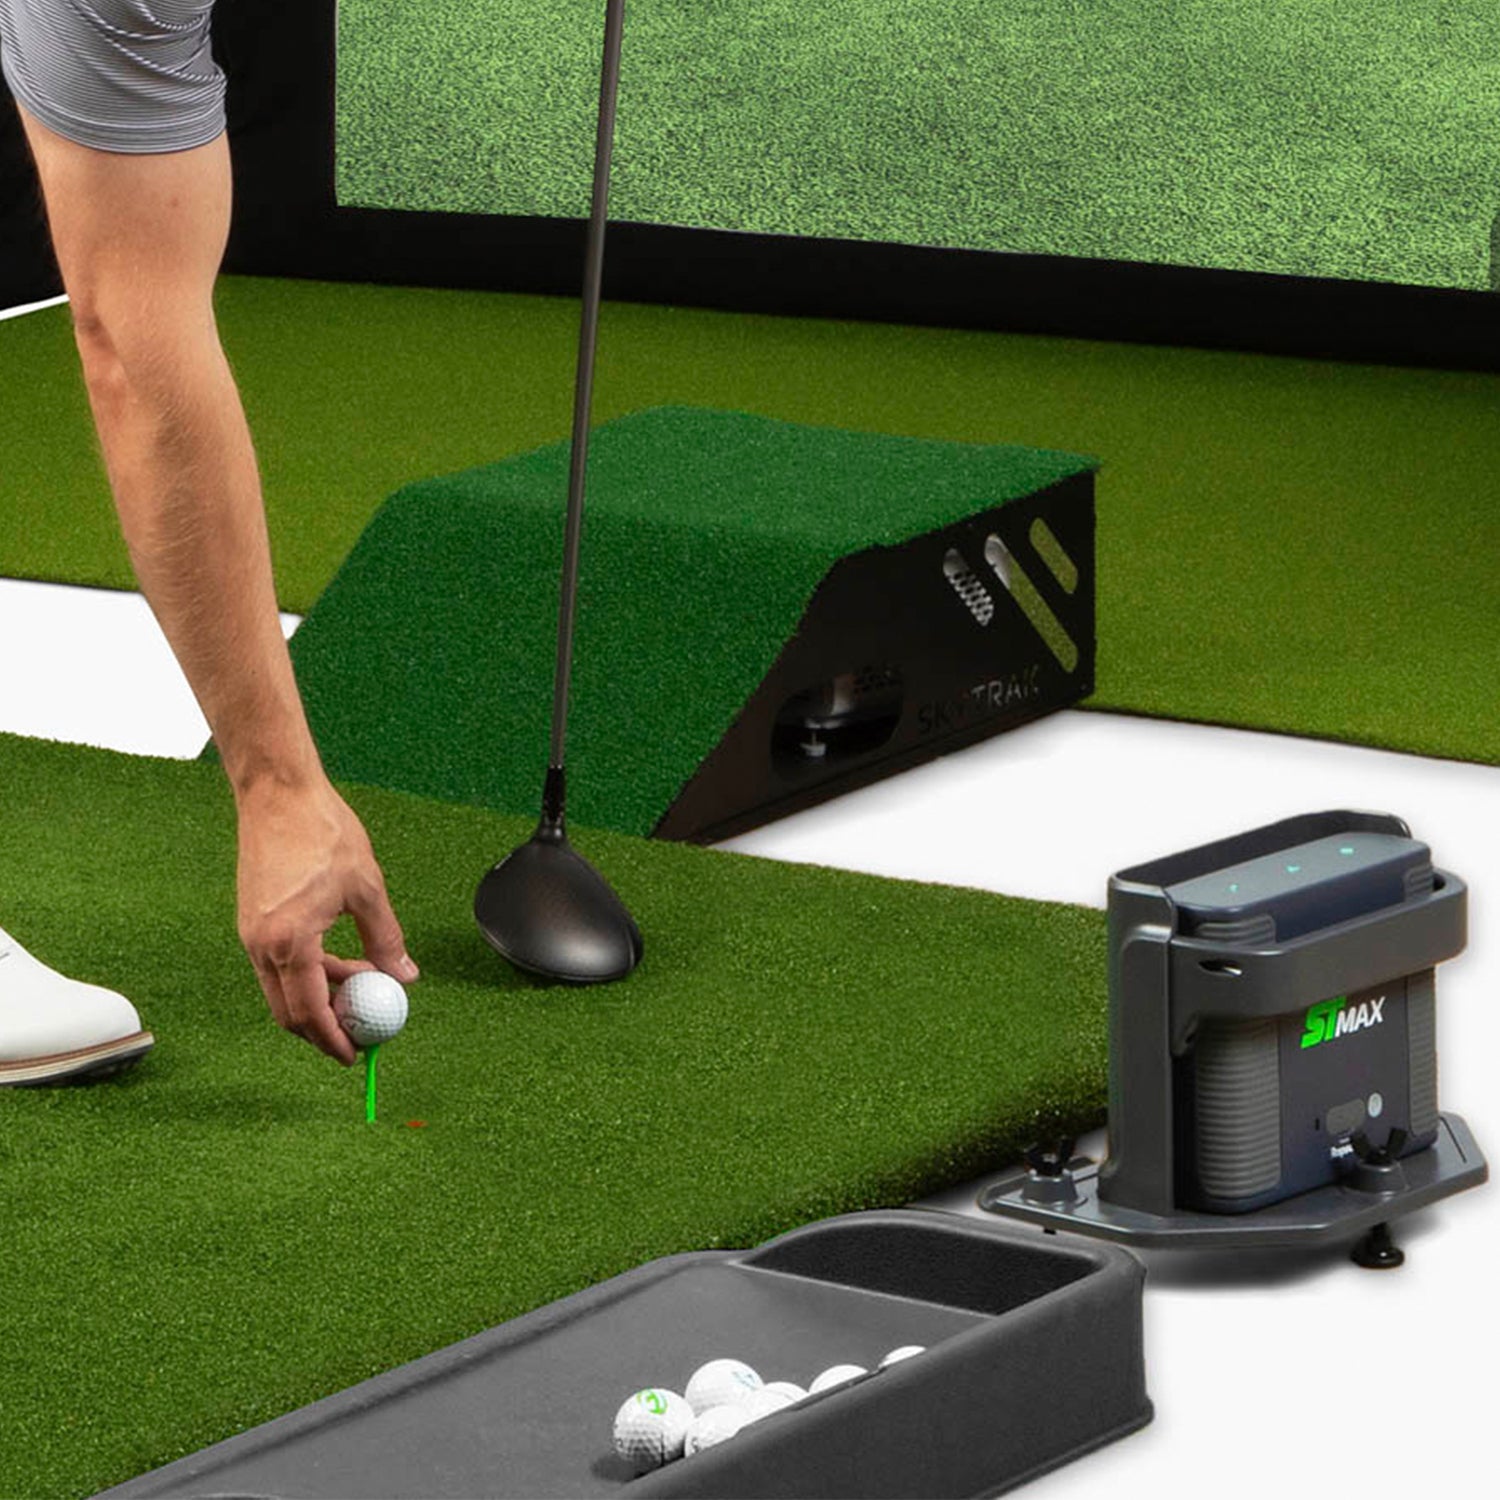
02:06getting putting turf. You get the 5x5 hitting mat. And of course, you get the ST Plus launch monitor. And then in the ultimate package, you get the GT200 HDR Optima projector. The one thing that I do have that is an add-on is the SkyRack projector floor mount case. This is just good to protect the projector on the floor, especially in a place like a garage. The great thing is that with all of these packages, they all come with everything that you need for the
02:40complete home golf simulator setup. So, now that we've walked through everything, I'm going to start unboxing and we'll start the assembly. I just unboxed the 8-ft enclosure, the frame, and the screen. So, I'm going to walk you through everything that is going to be inside of the box. The first thing that you'll see are all of the frame poles. Then, you've got your corner brackets for your legs in the top. We've also got these brackets to uh use straps to tighten it down with. And then last,
03:14we've got the enclosure and the screen. So, I'll walk through that here in just a minute. But that is everything that is inside of the enclosure box along with an instruction manual that walks you through step by step everything that you need to do to put this together. To start the assembly, here is also a quick tip. When you open the instruction manual, you're going to see the enclosure buildout. What I prefer to do is actually start from the top and build my way down. And
03:48I'm going to get halfway through building down and then I'm actually going to put the enclosure on. So you'll see that as I go through it.
04:01I've got the top built for the frame. So, the next step, again, this is a quick tip you could say, is that I'm going to go ahead and put the enclosure on top of my frame and then finish out with the next layer of the frame. Trust me, especially if it's just one person, this will make assembly so much easier. One thing that's different with the 8 foot versus the other sizes is that your screen is inside of the enclosure already. So, just make sure that you take the screen out before you start
04:35moving on with the enclosure piece. Another tip that I have for you is one of the questions that we get asked the most is how do you put the enclosure on? So, one of the things that I like to tell everyone to be on the lookout for is your top of the enclosure is going to have three Velcro tie downs on it. So once you find those, you can identify this is the top. The other two sides also have Velcro tie downs as well, but you will know because it's going to be on a much much shorter side. I went
05:14ahead and velcro just a little bit of my side here so that now I can show you where the uh back of the screen will be. So, right here, you can see as I'm about to continue to go around and I raise this up, everything will be in place. Now, I've got the top of the enclosure in a good place. I went through and I just made the Velcro be a little bit tighter. Made sure that it looks good. The next step, while I'm here, while this is low, I'm going to go ahead and
05:44put my Velcro tie downs on. So, this is just a simple process. You don't want to make these too tight yet. You'll tighten these down once you're finished with the whole enclosure. Now, one of the last steps of getting the enclosure fully built is I'm going to put the rest of the legs on and the base. So, that's why putting the enclosure on from the top down makes the process just a little bit easier, especially whenever you just have one person because reaching up to the top is
06:17extremely difficult.
06:25Now I've got the enclosure and the frame fully built. What we're going to do is work on the Velcro on the sides. My recommendation here is don't tighten it down too much just yet. Just get it in a good place and then put your screen on. So I'll walk you through that here in just a second. But for right now, just going to go through, get my sides in a good place, and then attach the screen. One of the last steps when putting the enclosure up, just like on the top, you
06:57take your Velcro tie downs here. You've got three on each side. Just don't forget about that. Or if you're going through the box and you're like, "What are these things?" Now you know what they are. So, you got three on each side.
07:18Last step with the enclosure is the impact screen. So, we've made it even easier for you to install this. Now, there are tabs that tell you what the top are. So, it's Velcro all around except for the bottom. Once you find your top, you just start with your Velcro in your corner and your top. So, this is my upper right hand corner.
07:47And there you have it, an 8ft studio enclosure. And again, I did this by myself. I promise it's even easier whenever you do have a buddy there to help. Just to review, like I said, you want to start by building the frame from the top down. Halfway through the build, go ahead and put your enclosure on and then start to continue the build and raise it up and then tighten it down on your sides with those Velcro straps. Last thing that you're going to do is install your impact screen. That might
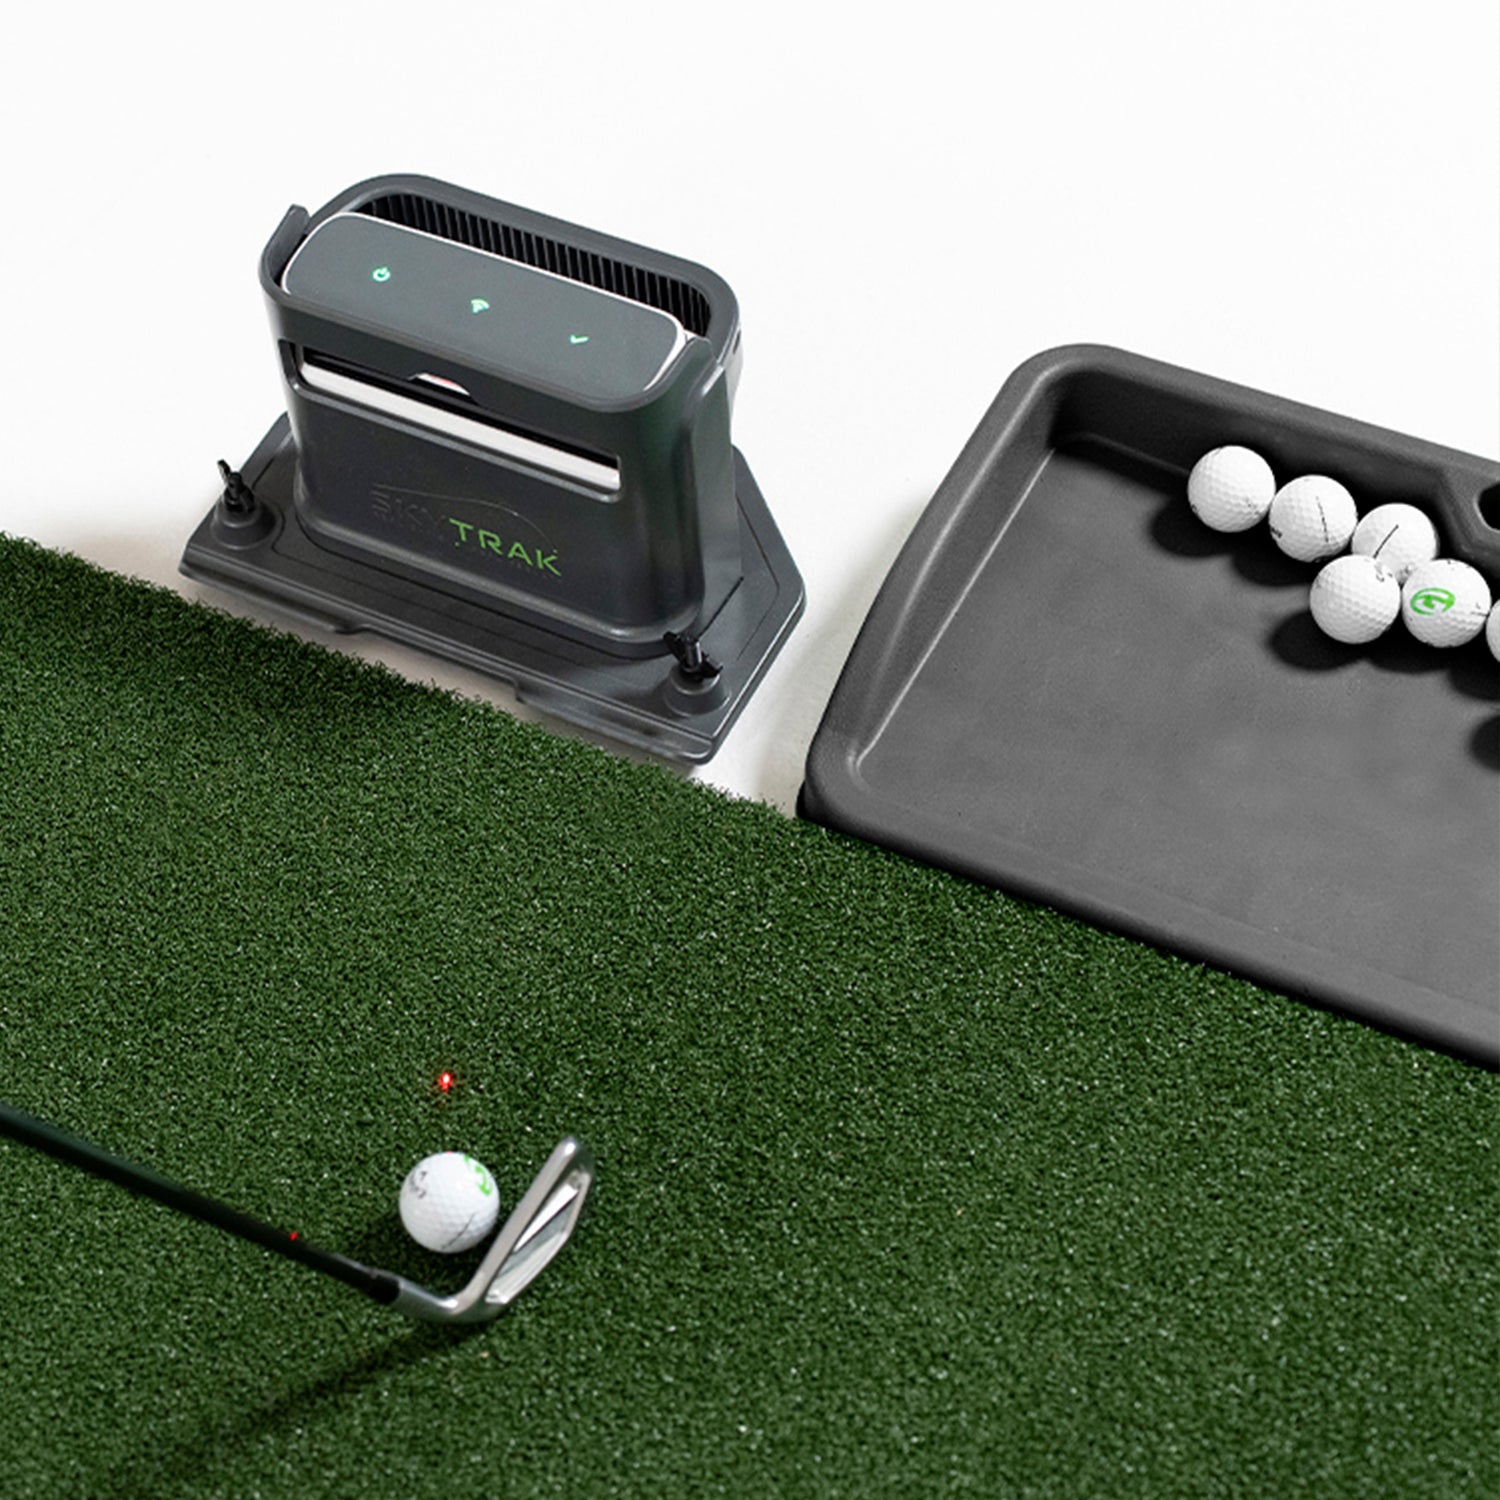
08:21take a little bit of moving and adjusting, but once you get it in a good place, just go back through and make sure your Velcro is nice and tight and snug, and you're good to go. Moving ahead to the next steps in your simulator setup. I'm going to go ahead and lay out my hitting mat, my ball tray, and my projector, and the floor mount case.
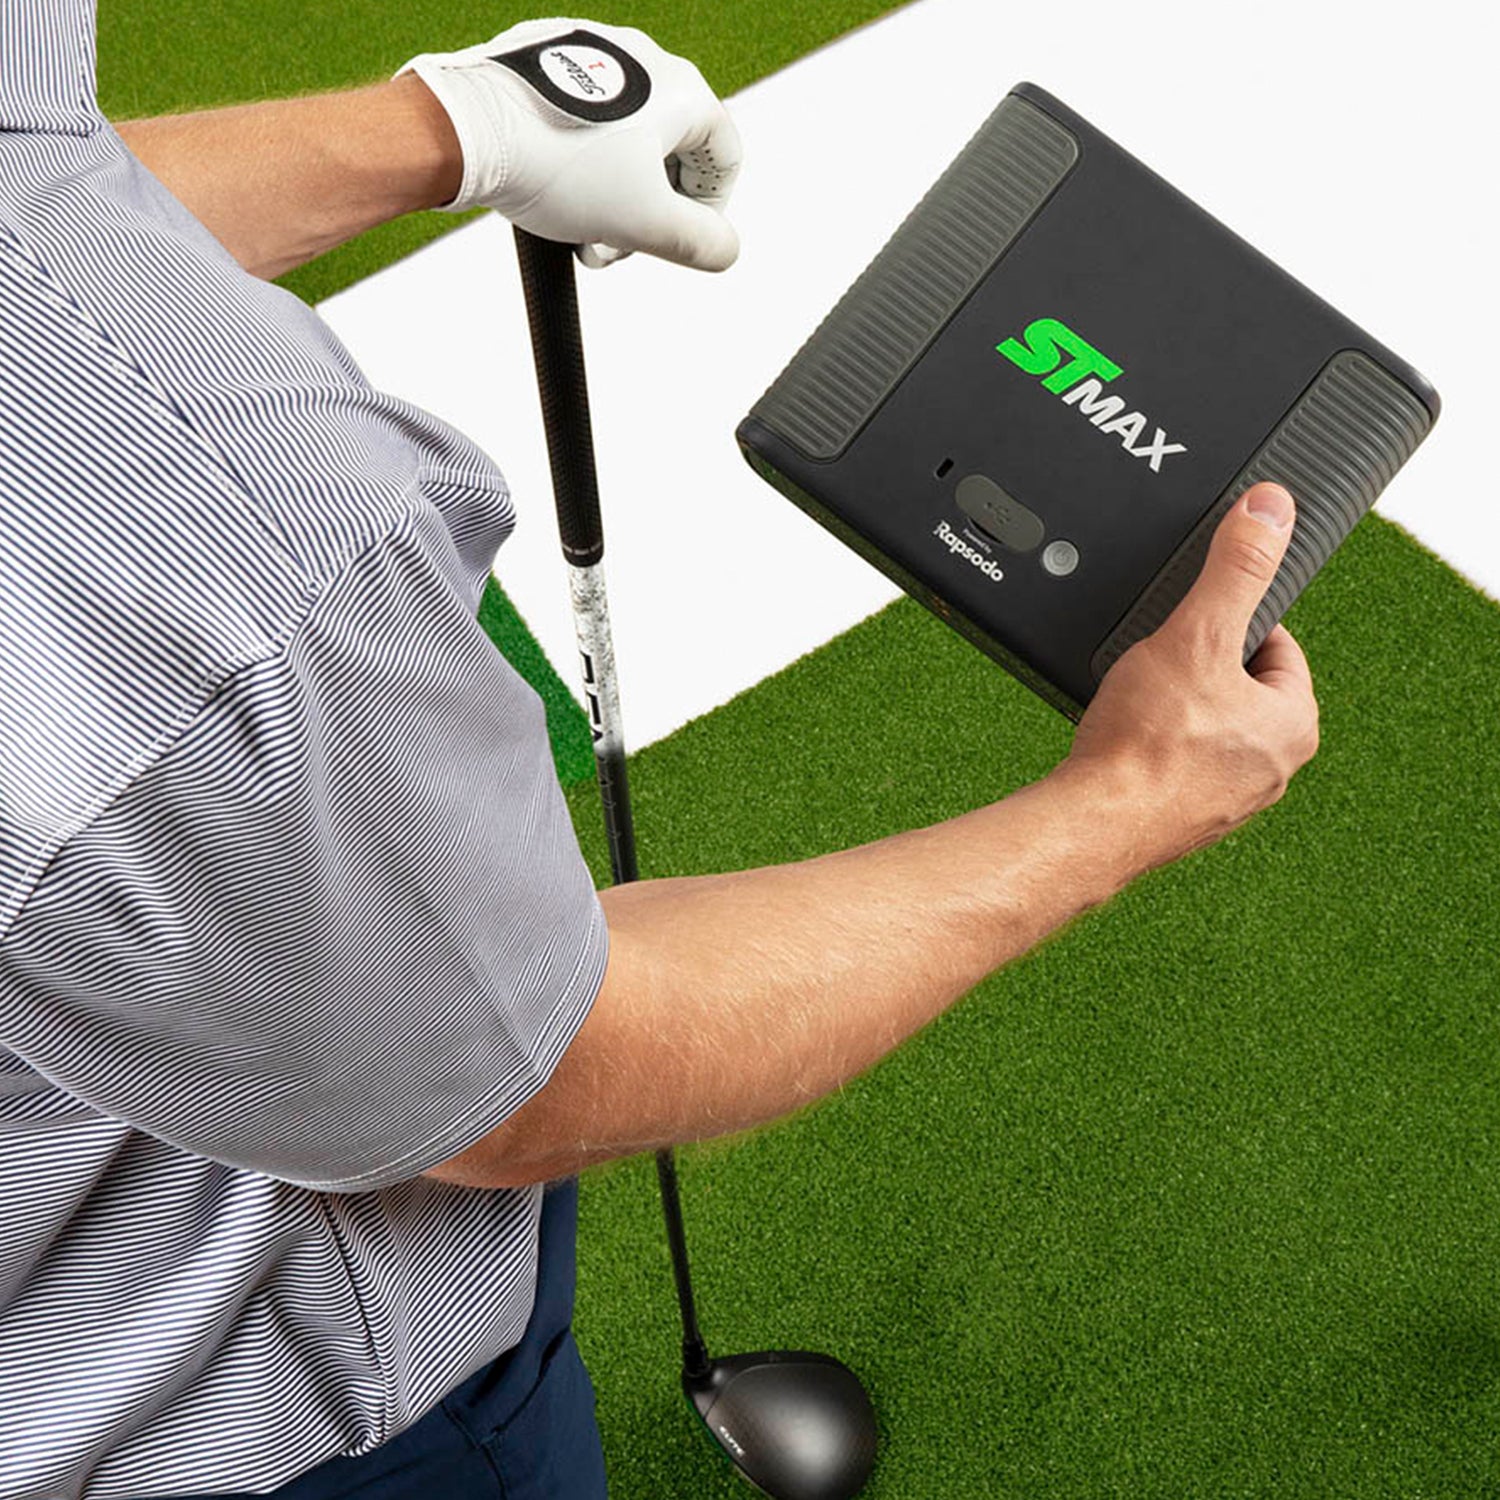
09:06All right, we are almost finished with the full simulator setup. We will do a separate video on how to set up your projector. And if you already have an ST+ unit in a studio, make sure you go over to skyrackgolf.com and click on getting started and that'll walk you through step by step how to set up your ST+ launch monitor. And our final step, the ST+ launch monitor. Going to go ahead and unbox this and then get it set up. Look at that. Such an awesome looking piece of equipment. Look at that.
09:56All right, there you have it. I just built the new 8ft golf simulator studio from SkyRack in my garage. I got to admit, this is a dream come true. So, if you're interested in building your dream golf simulator, I encourage you to go over to skitrackgolf.com, check out all of the different packages that we have that will fit within your budget and within your space. And if you have any questions at all, you can book a free consultation with one of our sim pros. And now for the fun part. Hey.
10:48Hey. Hey.
00:00:00Welcome to my two-car garage transformation into a dream home golf simulator using SkyRack's new 8ft studio, where I'll show you the unboxing, setup, and first use.
00:00:30The garage is a standard two-car space measuring 20 by 24 feet with a 10-foot ceiling, accommodating golf club swings despite fixed obstacles like a staircase and storage rack.
00:01:36The ultimate SkyRack studio package includes everything needed for a complete home golf simulator setup, featuring an 8ft studio, ball tray, enclosure, turf, hitting mat, ST Plus launch monitor, GT200 HDR Optima projector, and an optional projector floor mount for protection.
00:02:45The unboxing includes an 8-ft enclosure with frame poles, corner brackets, straps, the enclosure and screen, plus an instruction manual recommending starting assembly from the top down.
00:04:01Place the enclosure on the frame before finishing the next layer, remove the screen inside the enclosure for 8-foot models, and identify the top by locating the three Velcro tie downs to ease assembly.
00:05:14The enclosure is being assembled from the top down with Velcro adjustments and tie downs, and the final steps include attaching the legs and base to make the process easier for one person.
00:06:25The enclosure and frame are built, and the next step is to loosely attach the Velcro on the sides before putting on the screen, remembering to use the three Velcro tie downs on each side.
00:07:18The final step with the enclosure is installing the impact screen using Velcro tabs that indicate the top, starting from the upper right corner.
00:07:47The video demonstrates how to build an 8ft studio enclosure solo, emphasizing starting the frame from the top down, securing it with Velcro straps, installing the impact screen, and then setting up the hitting mat, ball tray, projector, and floor mount case.
00:09:06We are nearly done with the full simulator setup and will provide a separate video for projector setup, while also guiding ST+ unit users to skyrackgolf.com for step-by-step instructions before unboxing and setting up the ST+ launch monitor.
00:09:56I just built an 8ft SkyRack golf simulator studio in my garage and encourage you to visit skitrackgolf.com to explore packages and book a free consultation.
🏠 Transforming a standard two-car garage into a dream home golf simulator is possible with SkyRack's new 8ft studio.
📏 Ceiling height is crucial for a golf simulator setup, with a minimum of 9ft recommended to swing every club comfortably.
🛠 Building the enclosure from the top down and installing the enclosure halfway through assembly makes solo setup much easier.
🔗 Velcro tie downs on the enclosure and impact screen simplify installation and adjustment for a snug fit.
🎥 The ultimate studio package includes everything needed for a complete simulator, including a launch monitor and projector.
💡 Free consultations are available to help customize your golf simulator to fit your space and budget.
00:00What's up, Skyrack? Welcome to my twocar garage that I'm about to turn into a dream home golf simulator. We're going to be using SkyRack's newest 8ft studio available now. I'm going to show you everything from unboxing to setup to me finally hitting on it. Let's get into it.
00:30First, let's talk about my overall garage setup. It is a very standard twocar garage. I'm going to go through the measurements that way you have a frame of reference for yours. I've already measured this, so I do know it's 20 ft in width, but I'll just show you here. So, I've got 20 feet width. And then here, this is going to be 24 feet of depth. Ceiling height is a question that we get all the time. We advise that depending on your height, you're going to want 9 ft minimum. So,
01:07you can be able to swing every club in your bag. Luckily for me, my ceiling height with the garage door down is 10 ft. So, I've got plenty of room for every club in my bag. A couple of the things that I've had to take into consideration with my garage setup. Number one, I've got this staircase right here. So, I'm not going to move that at all. And then two, I've got a big storage rack here that I'm also not going to move. So, that just goes to show that whatever your space is,
01:36especially with this new 8ft studio, we'll be able to make it work in even the smallest of spaces. We've walked through the garage setup. We've walked through some of the challenges that I have. Now all I need is the SkyRack studio. For this package that I got, I went with the ultimate studio package. So with that, you get the ball tray, you get your enclosure, which is your frame, your screen, and your enclosure. You get your 8ft or whatever size that you're
02:06getting putting turf. You get the 5x5 hitting mat. And of course, you get the ST Plus launch monitor. And then in the ultimate package, you get the GT200 HDR Optima projector. The one thing that I do have that is an add-on is the SkyRack projector floor mount case. This is just good to protect the projector on the floor, especially in a place like a garage. The great thing is that with all of these packages, they all come with everything that you need for the
02:40complete home golf simulator setup. So, now that we've walked through everything, I'm going to start unboxing and we'll start the assembly. I just unboxed the 8-ft enclosure, the frame, and the screen. So, I'm going to walk you through everything that is going to be inside of the box. The first thing that you'll see are all of the frame poles. Then, you've got your corner brackets for your legs in the top. We've also got these brackets to uh use straps to tighten it down with. And then last,
03:14we've got the enclosure and the screen. So, I'll walk through that here in just a minute. But that is everything that is inside of the enclosure box along with an instruction manual that walks you through step by step everything that you need to do to put this together. To start the assembly, here is also a quick tip. When you open the instruction manual, you're going to see the enclosure buildout. What I prefer to do is actually start from the top and build my way down. And
03:48I'm going to get halfway through building down and then I'm actually going to put the enclosure on. So you'll see that as I go through it.
04:01I've got the top built for the frame. So, the next step, again, this is a quick tip you could say, is that I'm going to go ahead and put the enclosure on top of my frame and then finish out with the next layer of the frame. Trust me, especially if it's just one person, this will make assembly so much easier. One thing that's different with the 8 foot versus the other sizes is that your screen is inside of the enclosure already. So, just make sure that you take the screen out before you start
04:35moving on with the enclosure piece. Another tip that I have for you is one of the questions that we get asked the most is how do you put the enclosure on? So, one of the things that I like to tell everyone to be on the lookout for is your top of the enclosure is going to have three Velcro tie downs on it. So once you find those, you can identify this is the top. The other two sides also have Velcro tie downs as well, but you will know because it's going to be on a much much shorter side. I went
05:14ahead and velcro just a little bit of my side here so that now I can show you where the uh back of the screen will be. So, right here, you can see as I'm about to continue to go around and I raise this up, everything will be in place. Now, I've got the top of the enclosure in a good place. I went through and I just made the Velcro be a little bit tighter. Made sure that it looks good. The next step, while I'm here, while this is low, I'm going to go ahead and
05:44put my Velcro tie downs on. So, this is just a simple process. You don't want to make these too tight yet. You'll tighten these down once you're finished with the whole enclosure. Now, one of the last steps of getting the enclosure fully built is I'm going to put the rest of the legs on and the base. So, that's why putting the enclosure on from the top down makes the process just a little bit easier, especially whenever you just have one person because reaching up to the top is
06:17extremely difficult.
06:25Now I've got the enclosure and the frame fully built. What we're going to do is work on the Velcro on the sides. My recommendation here is don't tighten it down too much just yet. Just get it in a good place and then put your screen on. So I'll walk you through that here in just a second. But for right now, just going to go through, get my sides in a good place, and then attach the screen. One of the last steps when putting the enclosure up, just like on the top, you
06:57take your Velcro tie downs here. You've got three on each side. Just don't forget about that. Or if you're going through the box and you're like, "What are these things?" Now you know what they are. So, you got three on each side.
07:18Last step with the enclosure is the impact screen. So, we've made it even easier for you to install this. Now, there are tabs that tell you what the top are. So, it's Velcro all around except for the bottom. Once you find your top, you just start with your Velcro in your corner and your top. So, this is my upper right hand corner.
07:47And there you have it, an 8ft studio enclosure. And again, I did this by myself. I promise it's even easier whenever you do have a buddy there to help. Just to review, like I said, you want to start by building the frame from the top down. Halfway through the build, go ahead and put your enclosure on and then start to continue the build and raise it up and then tighten it down on your sides with those Velcro straps. Last thing that you're going to do is install your impact screen. That might
08:21take a little bit of moving and adjusting, but once you get it in a good place, just go back through and make sure your Velcro is nice and tight and snug, and you're good to go. Moving ahead to the next steps in your simulator setup. I'm going to go ahead and lay out my hitting mat, my ball tray, and my projector, and the floor mount case.
09:06All right, we are almost finished with the full simulator setup. We will do a separate video on how to set up your projector. And if you already have an ST+ unit in a studio, make sure you go over to skyrackgolf.com and click on getting started and that'll walk you through step by step how to set up your ST+ launch monitor. And our final step, the ST+ launch monitor. Going to go ahead and unbox this and then get it set up. Look at that. Such an awesome looking piece of equipment. Look at that.
09:56All right, there you have it. I just built the new 8ft golf simulator studio from SkyRack in my garage. I got to admit, this is a dream come true. So, if you're interested in building your dream golf simulator, I encourage you to go over to skitrackgolf.com, check out all of the different packages that we have that will fit within your budget and within your space. And if you have any questions at all, you can book a free consultation with one of our sim pros. And now for the fun part. Hey.
10:48Hey. Hey.
Shop Simulator Studios